PC POS Terminal Integration via USB
FOMO Pay - PC POS Terminal Integration via USB Connectivity - User Guide
User Guide for PC POS Terminal Integration via USB Connectivity v1.0.0
1. Get ready before integration
1.1 POS Terminal and FOMO App
- Obtain the POS terminal provided by FOMO, and make sure the POS has FOMO Pay App installed.
- Turn on the POS terminal. Go to Settings -> Display -> Screen Timeout. Make sure the screen timeout has been set to Never.
- This is to avoid unexpected interruption between the POS terminal and the computer.
- Screen timeout settings may vary for different POS device models. If you cannot find the settings, kindly contact our FOMO support team via WhatsApp Group, or send email to support@fomopay.com for help.
1.2 Computer and accessories
- USB A to USB C cable.

Figure 1. Sample of USB A to USB C cable
- Requirement of the computer operation system:
- Windows 10 and above;
- Mac OS.
- Make sure you have the local admin permission to install the .exe files provided by FOMO.
1.3 Installation Package
| S/N | Application | Remarks | Local Package |
| 1 | Zadig | USB Driver Installation | zadig-2.9.exe Direct local file. |
| 2 | pos-usb-client.exe | Desktop application for POS terminal integration | pos-usb-client.exe Direct local file. |
2. Setup
- Install Zadig and pos-usb-client.exe on your computer.
- Turn on POS terminal. Connect the POS terminal to the computer via USB cable. Make sure the screen is always on.
- Run Zadig.
- Select tab of Options -> List All Devices -> I23M01_GL.

- Input field should be auto populated.
- Notes: The prefilled value may vary for different device models. For more details, please contact FOMO staff to confirm.
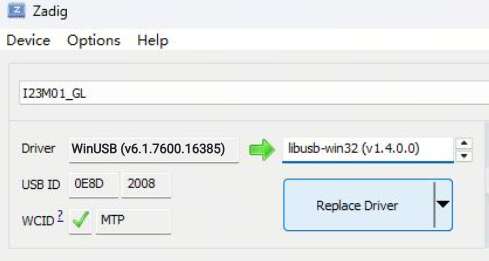
Figure 2. Screen capture of Replace Driver in Zadig
- Make sure the driver will be updated to libusb-win32(v1.4.0.0). Click the button of "Replace Driver".
- Open Device Manager -> USB Ports.
- Uninstall device for current device I23M01_GL.
- Disconnect the USB cable to the POS Terminal.
- Reconnect the POS Terminal.
Notes: 5b and 5c are necessary steps to reflect the correct driver name in Device Manager.
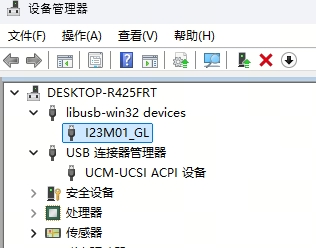
Figure 3. Screen capture of Device Manager after step 5c
- Open FOMO Pay App on POS Terminal. Go to the home page (i.e. Enter amount page).
- Open Command Prompt on the computer. Copy and paste the path of pos-usb-client.exe (e.g. sample path circled in red), then type in the following instruction and press the Enter button on the keyboard. The listener should be enabled.
connect --vid 0e8d --pid 2008 --listen localhost:8080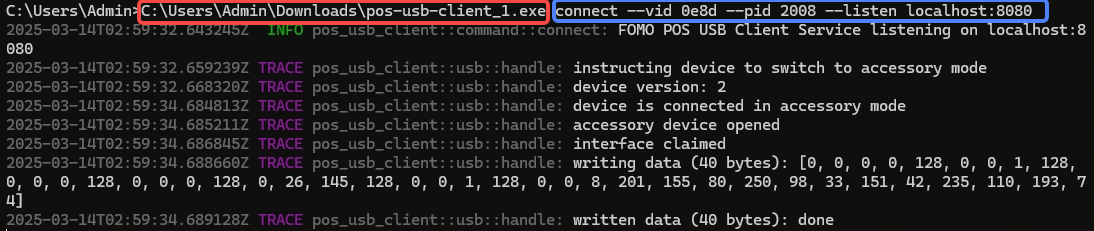
Figure 4. Screen capture of Command Prompt - Enable listener
- If the POS terminal prompts a message asking for authorizing the PC to control POS, select the option of "Always allowed" and confirm the authorization.
3. Integration with POS Terminal
You can find the APIs at https://nsb26n6ul5.apidog.io/.
Please contact FOMO staff for the password.
3.1 Create payment
POST /CreatePayment
To instruct terminal into payment mode..
| Headers | Example |
| x-api-version | v1 |
Request
| S/N | Field Name | Field Type | Required (M/C/O) | Example | Comment |
| 1 | amount | string | M | 1.00 | |
| 2 | retrieval_reference_number | string | M | invoice-123456789 | |
| 3 | condition_code | Enum <string> | M | 82 | Refer to Table 1 for allowed values |
Response
| S/N | Field Name | Field Type | Required (M/C/O) | Example | Comment |
| 1 | success | boolean | M | true | |
| 2 | message | string | M | Create payment command processed | |
| 3 | retrieval_reference_number | string | M | invoice-123456789 | |
| 4 | condition_code | Enum <string> | M | 82 | Refer to Table 1 for allowed values |
Header Parameters
Request Body
application/json
TypeScript Definitions
Use the request body type in TypeScript.
Response Body
application/json
Example:
Appendix - Table 1 – Condition Code for Create payment, Query payment
If any payment method is not listed in this form, please contact FOMO staff.
| Condition Code (25) | Field Name | Additional Data (48) |
| 20 | WeChat Pay QR Code | X, not supported. Do not include this field with your request. |
| 21 | WeChat Pay Quick Pay | M, mandatory. Scanned WeChat barcode (authorization code). WeChat barcodes consist of 18 digits starting with 10, 11, 12, 13, 14 or 15. |
| 28 | Singtel Dash QR Code | X, not supported. Do not include this field with your request. |
| 30 | Alipay Merchant QR Code | X, not supported. Do not include this field with your request. |
| 31 | Alipay Barcode | M, mandatory. Scanned Alipay barcode. Alipay barcodes consist of 16 - 24 digits starting with 25, 26, 27, 28, 29 or 30. |
| 36 | NETS QR | X, not supported. Do not include this field with your request. |
| 50 | GrabPay | X, not supported. Do not include this field with your request. |
| 52 | Razer Pay | X, not supported. Do not include this field with your request. |
| 54 | UnionPay | X, not supported. Do not include this field with your request. |
| 82 | PayNow | X, not supported. Do not include this field with your request. |
| 46 | ShopeePay | X, not supported. Do not include this field with your request. |
3.2 Cancel payment
POST /CancelPayment
To instruct terminal into standby mode.
Please be reminded that in progress payment will not be cancelled automatically. If you need to void a payment, please use /VoidPayment.
| Headers | Example |
| x-api-version | v1 |
Request
| S/N | Body Params | Example | Comment |
| 1 | object{} | {} |
Response
| S/N | Field Name | Field Type | Required (M/C/O) | Example | Comment |
| 1 | success | boolean | M | true | |
| 2 | message | string | M | Cancel payment command processed |
Header Parameters
Request Body
application/json
TypeScript Definitions
Use the request body type in TypeScript.
Response Body
application/json
Example:
3.3 Query payment
POST /QueryPayment
To query a payment status.
| Headers | Example |
| x-api-version | v1 |
Request
| S/N | Field Name | Field Type | Required (M/C/O) | Example | Comment |
| 1 | retrieval_reference_number | string | M | invoice-123456789 |
Response
| S/N | Field Name | Field Type | Required (M/C/O) | Example | Comment |
| 1 | success | boolean | M | true | |
| 2 | message | string | M | Query payment command processed | |
| 3 | retrieval_reference_number | string | M | invoice-123456789 | |
| 4 | condition_code | Enum <string> | M | 82 | Refer to Table 1 for allowed values |
| 5 | transaction_id | string | O | 100100090250128303091105 | |
| 6 | transaction_status | Enum <string> | O | 00 | Refer to Table 2 for allowed values |
Header Parameters
Request Body
application/json
TypeScript Definitions
Use the request body type in TypeScript.
Response Body
application/json
Example:
Appendix - Table 2 – Response Code for Query payment Response
| Response Code | Field Name |
| 00 | Payment success |
| 03 | Invalid merchant |
| 05 | Payment error |
| 06 | Payment closed |
| 09 | Payment in progress |
| 12 | Invalid transaction |
| 21 | Payment void |
| 22 | Payment reversed |
| 23 | Payment cancelled |
| 30 | Format error |
| 96 | System malfunction |
3.4 Void payment
POST /VoidPayment
To void a payment.
| Headers | Example |
| x-api-version | v1 |
Request
| S/N | Field Name | Field Type | Required (M/C/O) | Example | Comment |
| 1 | retrieval_reference_number | string | M | invoice-123456789 |
Response
| S/N | Field Name | Field Type | Required (M/C/O) | Example | Comment |
| 1 | success | boolean | M | true | |
| 2 | message | string | M | Void payment command processed |
Header Parameters
Request Body
application/json
TypeScript Definitions
Use the request body type in TypeScript.
Response Body
application/json
Example:
3.5 Submit batch
POST /SubmitBatch
To submit in a batch.
| Headers | Example |
| x-api-version | v1 |
Request
| S/N | Body Params | Example | Comment |
| 1 | object{} | {} |
Response
| S/N | Field Name | Field Type | Required (M/C/O) | Example | Comment |
| 1 | success | boolean | M | true | |
| 2 | message | string | M | Submit batch command processed |
Header Parameters
Request Body
application/json
TypeScript Definitions
Use the request body type in TypeScript.
Response Body
application/json
Example: